Screenshots match the guide language. Tap an image to open its full-size version; use browser zoom for a closer look.
STEP 01
Meet the three pattern parts
Open the designer and choose English in the navigation. Each design contains Body, Round Base, and Round Lid. All three belong to one design file, but each can have its own dimensions and motif. Switching parts does not create a new design.
No login is required. Your current draft saves automatically in the browser you are using. Export a backup before replacing an important design or reducing the canvas size.
- Body: a flat motif with square and rectangular canvas options.
- Round Base: a pattern growing outward from the center, controlled by the number of rounds and starting stitches.
- Round Lid: an optional part that you can draw separately or copy from the base.
STEP 02
Set the bag body dimensions
The stitch count sets the number of columns; the row count sets the height in rows. These are not measurements in centimeters. The finished size also depends on yarn, hook, technique, and crochet tension.
- Choose Body and enter a Pattern name, such as “Mochila practice”.
- Select Rectangle to adjust stitches and rows independently.
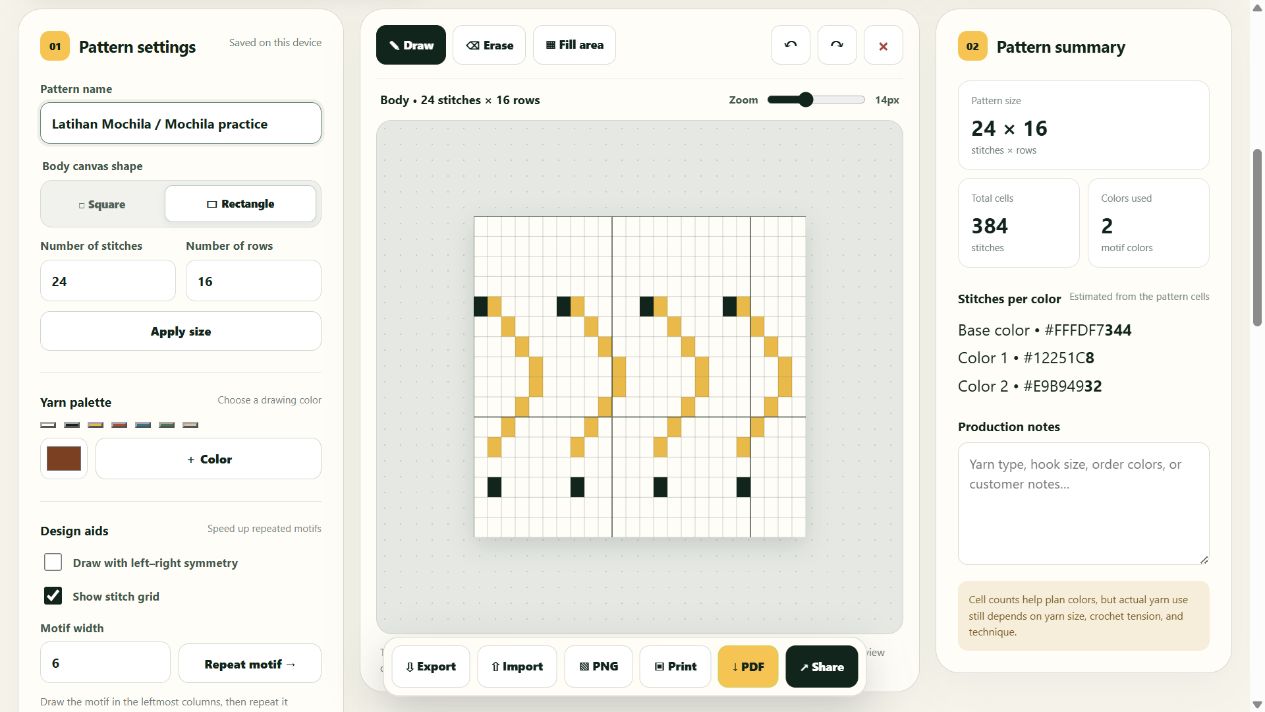
- Set Number of stitches to 24 and Number of rows to 16, then click Apply size.
- Check Pattern summary: 24 × 16 produces 384 cells. With Square selected, the row count follows the stitch count.
STEP 03
Draw a motif and choose colors
Choose a color from Yarn palette, select Draw, then tap or drag across canvas cells. Each cell represents one stitch in the design. Select another color for the next area of your motif.
- Draw paints stitches with the selected color.
- Erase returns stitches to the base color; the cells and pattern dimensions remain.
- Fill area paints a connected group of stitches of the same color. Try it on a small area first.
- Undo and Redo help correct drawing steps. Clear canvas removes the active part’s motif after confirmation.
- To add a color, open New color, choose a shade, and click + Color. There is no dedicated palette-color removal button.
STEP 04
Repeat a motif across the body
Repeat motif works on the body. It takes the motif from the leftmost columns and copies it to the right, so finish your small sample on the left first.
- Draw a simple motif in the first six columns. For practice, use two colors and keep some base-colored background.
- Set Motif width to 6, then click Repeat motif →.
- A six-column motif fits four times across a 24-column body. Check the joins between repeats and the updated summary.
- Use Undo if the result is not right. Draw with left–right symmetry can help when drawing symmetrical body motifs.
STEP 05
Build a round base from the center
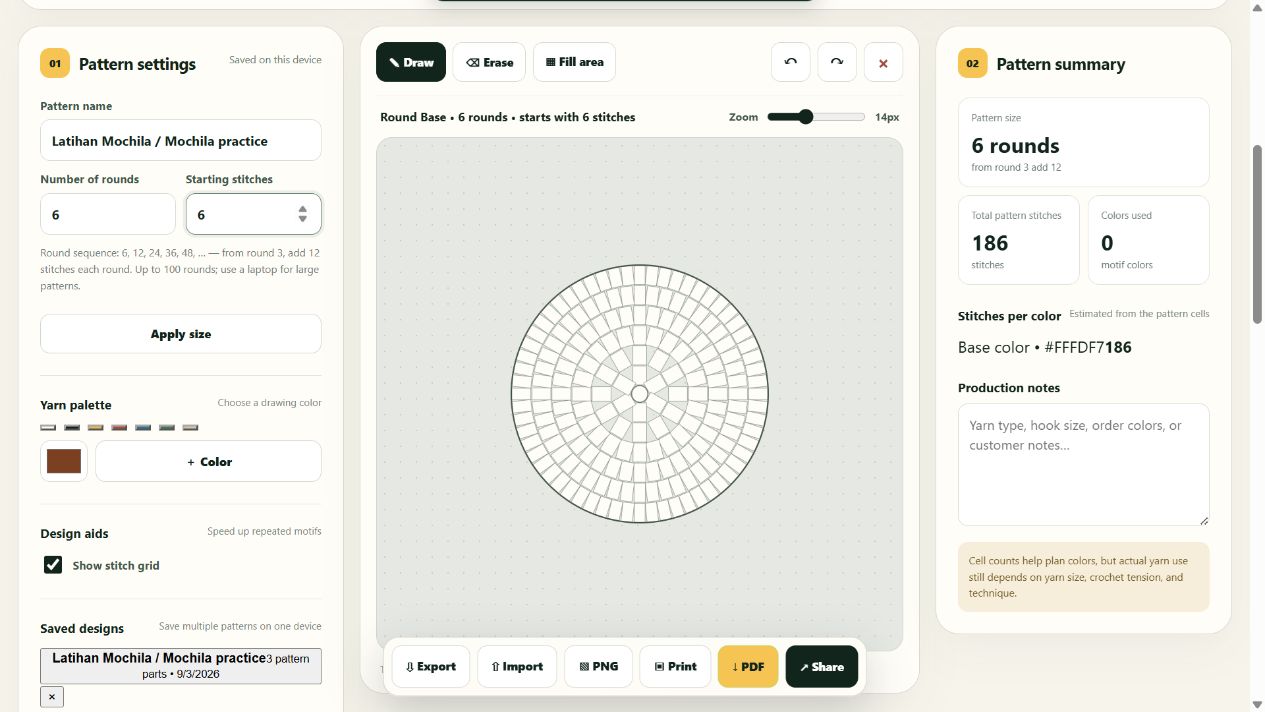
Select Round Base. The body settings are replaced by Number of rounds and Starting stitches. The canvas shows stitches arranged around the center; the first stitch in each round aligns toward the top.
- Set Number of rounds to 6 and Starting stitches to 6.
- Click Apply size. This example produces 6, 12, 24, 36, 48, and 60 stitches in successive rounds, totaling 186 stitches.
- Choose a color and draw on the circular stitches. Check both the canvas and Pattern summary after changing the number of rounds.
STEP 06
Create a lid and read the summary
Open Round Lid if your bag needs a lid. Set rounds and starting stitches as you did for the base, or use Copy pattern from base on the lid tab. Copying replaces the lid settings and motif with a copy of the base; afterward, the two parts can be edited independently.
The summary follows the active part. Stitches per color helps count both the base color and motif colors. Colors used counts used motif colors, excluding the base color.
- Review the body, base, and lid separately before creating output files.
- Use Production notes to record yarn, hook size, color choices, and project requirements.
- Stitch counts are not yarn estimates in grams or meters. Make a swatch and estimate yarn from your actual crochet work.
STEP 07
Save a design and make a backup
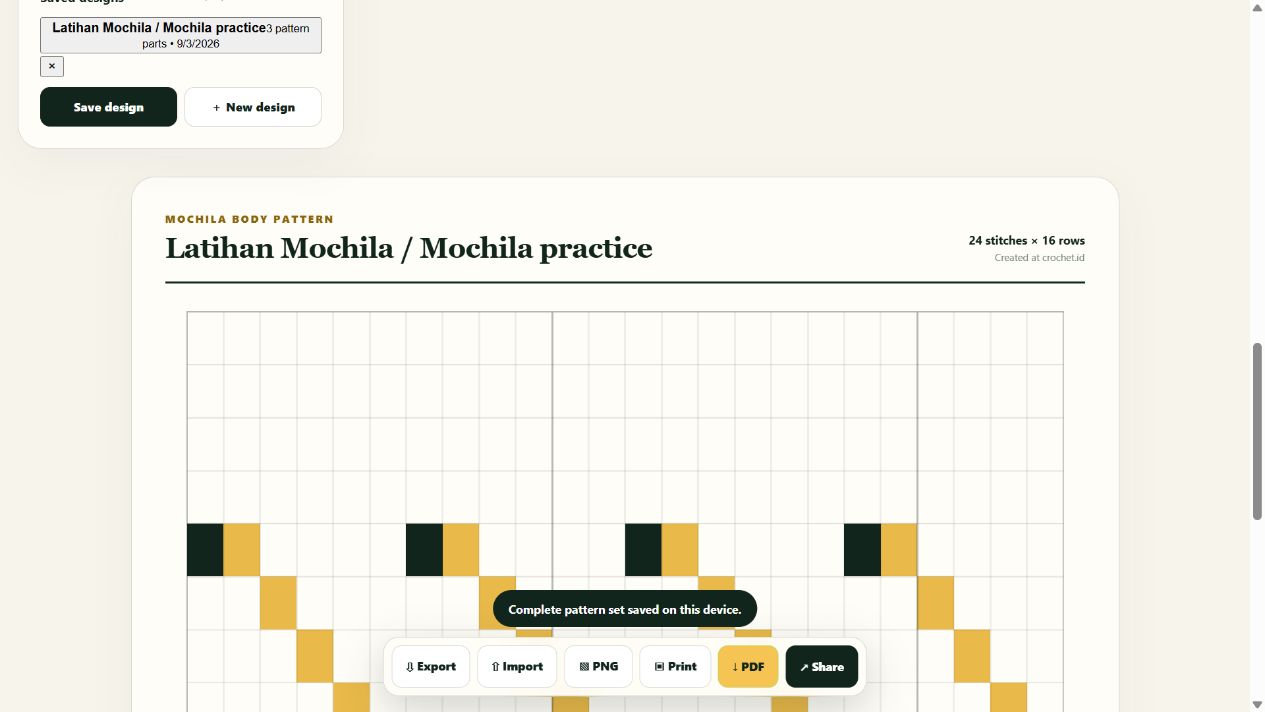
The automatic draft stores the work currently open. Save design adds or updates a named entry in Saved designs. Click an entry’s name to reopen it; use clear names to distinguish practice patterns from customer projects.
- Check Pattern name and Production notes, then click Save design.
- Click Export to download a .mochila.json file. Keep this editable backup in your project folder.
- To continue from a backup, click Import and select its JSON file. Import replaces the active draft with the file’s design, so save your current work first.
- Use + New design to start a fresh pattern set after saving your previous work.
STEP 08
Choose the right output file
JSON Export saves the complete design set. PNG, PDF, and Print use the active part instead. To get body, base, and lid images or PDFs, select each tab and download each part separately.
| Control | Output and purpose |
|---|---|
| Export | A .mochila.json file containing body, base, lid, palette and notes for future editing. |
| Import | Opens a compatible design JSON file. It does not turn photos into patterns. |
| PNG | An image of the active canvas. Useful for viewing or sharing a motif; it is not an importable design file. |
| An A4 document for the active part with the pattern, title, dimensions, color legend and notes that fit. Review the output before printing. | |
| Opens the browser print dialog for the active part. Check the preview, scaling and paper orientation. | |
| Share | Shares the tool’s URL. Your local motif and design file are not sent. |
STEP 09
Work more comfortably on a phone
If the laptop recommendation appears, choose Continue on Phone to keep using the tool. On a small screen, the canvas and settings stack vertically; scroll the page to move between sections.
- Start with a small pattern and adjust Zoom until individual stitches are easy to tap.
- Dragging on the canvas draws. To move around the pattern, swipe from empty space outside the canvas so you do not add unwanted strokes.
- Swipe the bottom action bar if some controls are out of view.
- Save regularly and export a JSON backup before changing devices.
- In this tutorial, tap any screenshot to open it at full size. Images keep their original proportions on desktop and phone screens.
Common questions
Why can’t I change the row count?
Square keeps rows equal to stitches. Select Rectangle to set the two dimensions independently.
Why hasn’t my PDF downloaded?
Wait for the page to finish loading and check that your connection allows the PDF library to load. Try PDF again, then check your downloads folder. Save a JSON backup before reloading.
Does switching language erase my pattern?
No. Bahasa Indonesia and English use different URLs but share the draft on the same Crochet.id domain. Recheck drawing aids such as motif width after navigation.
Can I import a screenshot, PNG or photo?
Not through Import. Import accepts compatible design JSON files; PNG and PDF are outputs for viewing or printing.
Why is my design missing on another device?
Saved designs belong to the original browser and device. Export JSON there, transfer the file, then Import it on the destination device.
Ready to continue your first pattern?
Run through this short check before closing the tool or starting to crochet.
- Review dimensions and motifs for every part.
- Check motif joins and stitches per color.
- Add a clear project name and notes.
- Save the design and download a JSON backup.
- Review the PNG or PDF for every part you need.